(I think there are only three people left in the world that don’t know about this method of album-using yet, so this post is for them. For the rest, this might be a little boring.) :)

About two years ago, Tara Whitney shared with the Garden Girls her method of scrapbooking. It was fantastic and I fell instantly in love. The rest of the scrapbook world had moved past “chronological scrapbooking”–scrapbooking their photos in the order they were taken. Photos were now supposed to be scrapbooked as inspiration struck and put in albums or piles haphazardly.

I just couldn’t do that because I’m obsessive. I wanted my photos to be seen in a linear fashion, so I kept an album for each year and filed my layouts accordingly. The problem came when I wanted to try 8.5×11 inch layouts, or when I didn’t know what to do with my digital layouts that I printed as 8×8 layouts (the photo paper to print a layout as a 12×12 is just too expensive to make it feasible). My solution then was to mount anything smaller than a 12×12 on black 12×12 cardstock.

When I saw the new solution, though–using 3 ring American Crafts albums to store a variety of page sizes in a variety of sizes of page protector–I was thrilled. The whole thing looked so interactive and awesome.

Here are a few shots of my 2008 album so far:

Colorado Springs wedding photographer shares her scrapbook albums

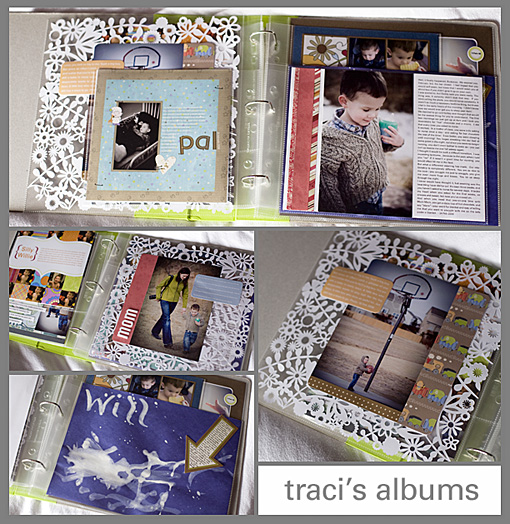
Digital layouts get printed as 8×8 (on 8.5×11 photo paper and then cropped), 8.5x11s get housed in their various page protectors (though you do have to punch an extra hole in the landscape oriented 8.5x11s to get them to go into the three ring albums), and 12x12s in theirs.

Because I’m sort of anal about keeping everything in order, I do keep an eye on my album and try to create layouts accordingly. So if I do a 12×12 of pictures in January, I’ll try to do another 12×12 of January pictures. Because otherwise you have an empty backside or a layout that is out of chronological order. But I don’t ALWAYS do that, I live with it if I haven’t (or plan to make a layout to fill that space). (In the case of the cool lace cardstock, I make a layout almost identical to the front on the back of the lace to preserve the see-through look (as shown above).

Ali Edwards recently started using this technique, and I loved her idea for making her own size of page protectors. Will painted his first picture at a neighbor’s house, and I wanted it to go straight into the album–no layout, but just that cute little picture. It was 12 inches wide and 9 inches tall. So I just snipped off the top of a 12×12 page protector to make it fit. (And stapled a little journaling block on there explaining that it was his first painting.)

I love that this method is more free and allows you to scrapbook in a more old-fashioned way–putting things in there of different sizes and shapes that aren’t even necessarily layouts. I think a lot more paintings and report cards will find their way into my albums in the coming years.

It’s a great way to deal with pictures that are too intimidating and important to scrapbook, too–just print them off as an 8×8 or 8.5×11, pop them into the page protector, and maybe add a small journaling block. That way you still get to look at it, even if you’re too scared that the layout you would make wouldn’t be perfect enough!

In many years, when the albums are less a work-in-progress and more a finished project, I plan on transfering them to post-bond albums (I’ll punch new holes in the page protectors if need be). The three ring is fine for now but I do love the way post-bond albums eliminate the center gap and look more formal. So when I’m an old lady in a nursing home, I’ll be sitting there with my hole punch, finishing off those albums.

Posted in Scrapbook


Continuing in our lens extravaganza…today I’ll go over my lens recommendations for different budgets/situations (another post most useful for Canon photographers–sorry)!

Recommendation #1: Don’t buy the kit lens by default.

The kit lens that Canon bundles with their dSLRs has increased in quality in the last couple of years, but if the lens isn’t a useful focal length for you or fast enough, it is still a waste of money. If it was me buying my first dSLR, I would buy the camera body only and pick the lenses I want to use and just buy those (which is what we did).

Recommendation #2: www.the-digital-picture.com is your best friend.

This is my all time favorite review site. Great in-depth reviews about Canon photography gear. This lens comparison feature is the coolest thing ever. Plug in two different lenses in the top two boxes, then select a focal length and aperture, and you get to compare the sharpness of the two lenses by moving your curser over the image and then back off to the side (don’t feel badly if you didn’t figure that part out straight away–I wasn’t so quick on figuring that out, either). It becomes very clear exactly what a difference a good lens makes!

Recommendation #3: Pay attention to how you like to take pictures

Will your camera mainly be brought out for vacation, or outdoor pictures, or macro shots, or inside pictures? The way you like to take pictures will make or break a lens for you. No matter how much my photographer heros love the 85mm f/1.8, it didn’t change the fact that it didn’t work for how *I* like to take pictures. So these recommendations may work for you, but they may not. Do plenty of research on the pros and cons of any lens you’re considering and then think about whether those pros and cons are important to your style.

Recommendations for your first lens, your everyday lens

Unless you’re a Rockefeller, you are probably wanting to buy just one lens to start out. This is a great way to go. You can become a lens collector and slowly add to your camera bag in a way that doesn’t make your checking account cry.

Or better yet, get your spouse equally addicted and you can start buying each other camera equipment for every holiday, anniversary, and birthday. Just remember that even if you bought a particular piece of equipment for your husband for his birthday, it’s still yours. And whatever he buys you for Christmas is also yours. It’s just all yours.

If your budget is tight – camera body + 50mm f/1.4

If you are looking to take pictures of your family and plan on being indoors for a goodly percentage of those pictures (the every day stuff), you cannot go wrong with this combo. I could be very happy taking our family pictures with just my 20d and 50mm f/1.4.

Do not attempt to save $100 and buy the 50mm f/1.8. The f/1.8 does not have pretty bokeh, and apparently it manages to fall apart all over the place. Invest a teeny tiny bit more and get a truly fantastic lens.

If your budget has a little more wiggle room – camera body + 24-70mm f/2.8 L

This was my first lens and first love. The image quality is fantastic, and the extra range of the 24-70 focal length is great. The 24-105mm IS also gets wonderful reviews, but I would miss the extra background blur you can get from having f/2.8 as an option. When I’m taking indoor pictures, background blur is my friend. I don’t need all of my relatives seeing exactly how many piles of laundry are in the background. Much better for them to be just blobs of color.

Next up– telephoto time

Your first lens needs to be an all-around lens with an easy focal length for everyday shots. But you’ll probably find that you are wanting to add a telephoto lens to the mix to be able to reach the animals at the zoo a little better, or sneak shots of your kids in the living room while you’re standing in the kitchen.

I could make out with my 70-200 f/2.8 IS lens, but it’s the sort of lens that you have to sell your firstborn child for. The 70-200 f/4 IS lens is $700 cheaper, lighter, and even a bit sharper. You’re probably not going to be using this lens indoors anyway (too much zoom), so unless you’re planning on shooting weddings in a church, the f/4 IS should cover you.

And then — going wide

Everyone needs to find their own priority list for lenses, but in my list, wide angles go toward the bottom. I think they are the hardest lenses to use well, the least flattering, and therefore the ones I pull from my bag the least often.

The tough thing about 1.6 FOVCF camera bodies is that it makes “normal” lenses out of wide angle lenses. In order to get a truly wide angle from a 40d or Rebel, you’ll want the 10-22mm EF-S lens.

***

I hope that was helpful! Let me know if you have any specific questions. I’ll be answering a few next week!

Posted in Photographer Tips


Continuing with our lens themed week (yesterday I wrote about basic lens information and last week I wrote about what to consider when purchasing a camera), today I’ll cover what lives in my camera bag (as well as the lenses that got booted from it).

Sorry Nikon photographers…this is a Canon post.

My Lenses

Canon 70-200 f/2.8 L IS

It is hard for me to pick a favorite lens, because I love them all, but if I had to pick just one favorite, it would probably be this one.

Pros: I love the beautiful bokeh it creates for portraits, and being a long (telephoto) fast (the maximum aperture is f/2.8) lens with 3 stops of image stabilization (I can take pictures in places that are three times darker), it is my best friend at indoor wedding ceremonies. I recommend it wholeheartedly to wedding photographers–I wouldn’t want to be without it. I also use it a lot for portraits–long lenses are more flattering, they condense a scene making it possible to bring a mountain or city skyline closer to your subject, and long lenses can also isolate a subject from a cluttered background better than a normal or telephoto lens.

Cons: It’s expensive. I think it would be hard to justify this lens if you couldn’t make money from it. People also complain about the weight…but I don’t think that’s a good reason not to carry the best equipment for the job. And needing to carry heavy equipment is a great reason to stay in shape. :)

Canon 135mm f/2.0 L

Since purchasing this lens last month, it has been a disproportionate amount of time on my camera. It definitely comes a close second to the 70-200 as my favorite lens. It’s the lens I keep on my camera for taking family pictures.

Pros: This is a long fast lens, so it has all the benefits of the 70-200 (with the exception of image stabilization). It’s faster than the 70-200 (f/2.0 instead of f/2.8) so the bokeh from it is even more amazing. It’s relatively lightweight. And this is one super sharp lens. The pictures I get from it are incredibly sharp and it focuses very quickly. A fellow photographer and friend of mine calls this her “magic lens.” At $900, it’s also a fantastic deal for such beautiful quality.

Cons: This is a fantastic focal length for my style and on my full frame 5d camera, but on a 1.6 FOVCF body (rebel, 20/30/40d, etc) I can see it being too long (or too “zoomed in”) for many people’s liking.

Canon 24-70 f/2.8 L

This was our first lens, and it is a fantastic multi-purpose lens. Many pros list it as their favorite lens, or the one lens they would keep if they could only have one.

Pros: It is fast, sharp, focuses quickly, and has a great range–a perfect “every day” focal length range.

Cons: I like the 24-70 more on a 1.6 FOVCF body than I do on the 5d–it’s a little too short for my style on a full frame body (but is great in tight quarters or for groups). This is another on-the-big/heavy-side lens.

Canon 17-40 f/4 L

This is our wide angle lens, and it does a great job of that. Perfect for wide angle wedding scenes.

Pros: It is a great wide angle lens. It is a fantastic deal–$650 and fairly small and lightweight. When I need a wide angle shot, I know I’m going to get a great one.

Cons: I’m not a huge fan of wide angles (though I know they are popular right now in portraits)–I prefer the flattering telephoto lenses. So this lens doesn’t get used much.

Canon 50mm f/1.4

This gets my vote for the one I recommend most to new photographers. If you are on a tight budget and can only get one lens, this is the one to get.

Pros: It is very fast, fantastically inexpensive ($250), and has beautiful bokeh (unlike it’s cheaper illegitimate sister, the 50mm f/1.8). This one also spends a lot of time on my camera at home. It’s wide aperture and multi-purpose “normal” focal length makes it a great bet for family photos. It is tiny and very lightweight. (And it’s the least expensive lens in my bag, so if something gets dropped or damaged from being out, at least it’s not an expensive loss!) You are also able to get very close to your subject with it–it has a minimum focusing distance of 1.5 feet, which means I can very nicely fill the frame with my little two year old subject.

Cons: Can’t think of any. Unless not having a pretty red “L series” stripe can counts as a con.

Lenses I have kicked to the curb

Canon 70-200 f/4 L

Pros: This baby is a fantastic value. One of the least expensive L lenses. It is sharp, relatively lightweight, and a great lens for traveling. We broke this one out for vacations and it was fantastic.

Cons: As a telephoto f/4 with no image stabilization, this was not a good indoor lens. The 70-200 f/2.8 IS kicked its butt, and then when we got the 135mm, we sold this one.

Canon 85mm f/1.8

Another prime lens (so far I’ve discussed the 50mm f/1.4 and the 135 f/2.0). Prime lenses are my faves and I plan on discussing the difference between primes and zooms later this week. But in short, prime lenses are usually a totally fantastic value because they only have to do one thing, and they can do that one focal length extremely well.

Pros: A lot of people like this lens.

Cons: I was not one of those people. To be fair, it IS a nice lens with great image quality and fast focusing at a great value (around $350). I think on a 1.6 FOVCF I would like this lens, but it was useless to me on the 5d. Every time I framed the shot how I wanted it, it would turn out I was too close and I’d have to take a step back. It has an almost 3 feet minimum focusing distance (compared to the 50mm’s 1.5 feet). I bought the 135mm to combat this problem (it also has a 3 feet min focusing distance, but being a much longer lens means that I can frame the shot just how I want it from that distance).

Posted in Photographer Tips