Photoshop Fridays: Week 1
Mar 07, 2008
We have (Photography) Tip Tuesdays, and now Photoshop Fridays…and I even have a plan for Saturdays, too (luckily you don’t have to wait long to find out what it is).
Photoshop has to be one of the most common image editing software programs around. Odds are it’s on your computer–even if you didn’t purchase it, you probably downloaded an illegal copy of Photoshop 7. (If you are receiving money for your photos, I beg of you to purchase a legal copy of Photoshop. It’s ridiculous to ask people to pay money for something you created with stolen goods.)
Even with all of those copies of Photoshop floating around the world, there are still many people that have no idea what it does or how to use it. So Photoshop Fridays are here to help. Sometimes it will be basic tips, sometimes things for a more advanced user. If you have specific Photoshop questions, just leave us a comment and I’ll either answer it, or find someone who can.
Lesson Number 1: Photoshop is not a magic wand.
The key to photoshop for the beginning user is subtlety. It is NOT the sort of thing that you should dive into thinking that you can make magic with. One of the most common beginner photoshop errors? Adding a person to the scene.
I give you exhibit a (and why I felt no guilt about showing my “Bad Picture” of Nic on Tuesday’s Photography Tips):
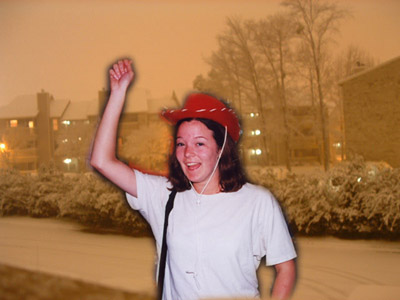
(Just as a disclaimer, I was not drinking before this picture was taken. But I can’t decide whether that helps or hinders my case.)
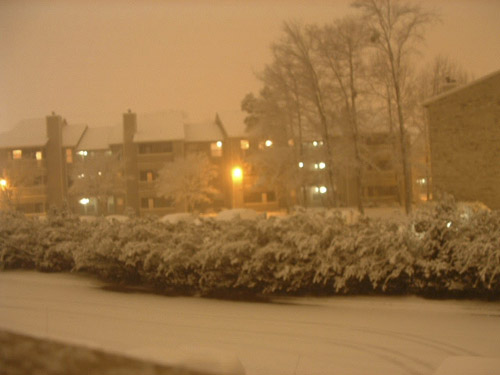
This picture, as you can immediately tell, is two pictures. One, of a snowy background:
And the other, of me trying on a hat at Disneyland:
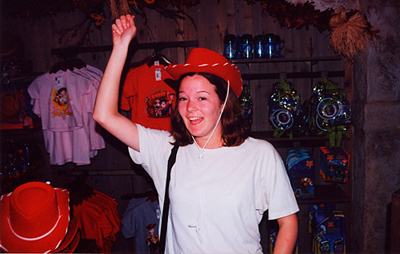
To amuse himself one night while we were dating many years ago, Nic decided to send me a picture to show me what it would be like if I was there in snowy Virginia with him. I remember that he could barely tell me to go check my email he was laughing so hard at his own picture joke.
To create a composite picture is easy enough. You open one photo (in this case, the snowy background). You open a new photo (in this case, a ridiculous picture of me at 18). You drag and drop your first photo onto your second photo. Go to your LAYERS menu, and under the opacity box (which right now will show 100%), lower it to around 50%–now you’d be able to see the picture of me under the snowy picture. Then grab your eraser tool and start erasing that top layer (in this case the snow scene) to reveal me beneath it:
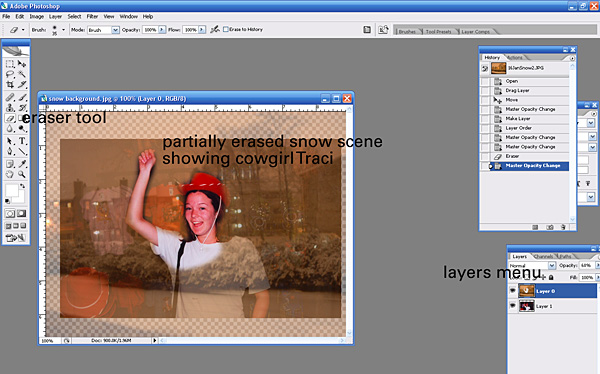
When you’re done erasing, you pop the opacity of that first layer back up to 100%, flatten the image and VOILA. You have something. And the word is SOMETHING.
The thing about most photo composites is that even if you’re very careful with your erasing, the picture still won’t look right unless you know what you’re doing. If you’re taking two pictures from two different scenes, dates, etc, the lighting and white balance will be different. In this case, we have a picture with direct flash, and an orangey no-flash, streetlamp lit picture.
To fix that, you either need to pull pictures from exactly the same day, angle, and lighting, or spend a lot of time trying to make the two pictures look like they were from the same moment. My advice is to leave it alone.
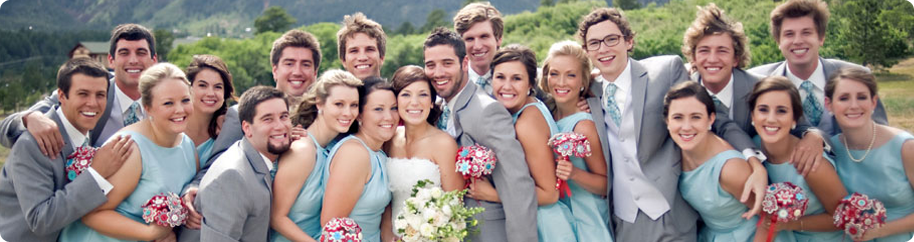
Here is a case where photo composites work (in this case, the infamous “head swap”):
(this is the part with actual advice, as opposed to a “please don’t do anything ugly like this” plea) For large groups, head swaps for photographers are probably inevitable. With dogs or little kids I *plan* on doing headswaps. I put myself in a single position and fire on burst mode. I get a ton of exactly the same shot with slightly different expressions on everyone’s face. That way if a person blinks or dog looks away, I can layer the photos, erase just that one area, and have it look seamless, because the two pictures were identical in angle and lighting.
Bottom line: Unless you set out to do it from the get-go, or really know what you’re doing and plan to adjust shadows and white balance and lighting effects and scale/angle, leave separate pictures as separate pictures. Otherwise they’ll look like a drunk cowgirl in a snowstorm.
Posted in Photoshop Tips
Comments
ha ha... I know you just said NOT to do this, but you know I have to go home and try it now :)
Susanne Mar 07, 2008 at 10:26http://www.youtube.com/watch?v=U_X5uR7VC4M For the more hands on visual learners......
» Photoshop Fridays: Week 1 Mar 07, 2008 at 09:47[...] [Technorati] Tag results for photoshop wrote an interesting post today onHere’s a quick excerpt We have (Photography) Tip Tuesdays, and now Photoshop Fridays…and I even have a plan for Saturdays, too (luckily you don’t have to wait long to find out what it is). Photoshop has to be one of the most common image editing software programs around. Odds are it’s on your computer–even if you didn’t purchase it, you probably downloaded an illegal copy of Photoshop 7. (If you are receiving money for your photos, I beg of you to purchase a legal copy of Photoshop. It’s ridiculous to ask people to [...]