Yesterday I shared pictures of my new photo purse:

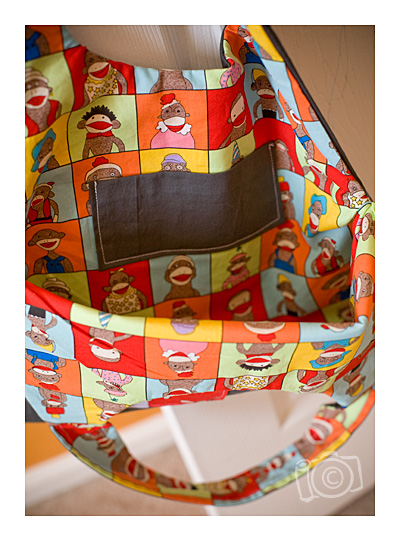
There are a lot of photo purses being sold to photographers right now, so I had decided to make one myself. Torm asked me to share the details…so here they are!
Fabric:
Monkey Fabrics: from Moda. It’s been sold out of most shops for a long time (all the fabric for this bag comes from The Stash). The inside fabric pops up here and there on Ebay–called Monkey Yearbook Photos or Funky Monkey Yearbook Portraits. Looks like you can find the second monkey fabric line here.
Other: A basic charcoal gray for the outside and inner pocket, a few scraps from Will’s scrap basket for the photo collage, and canvas for the inside of the bag to give it structure.
Pattern
The purse is based on the Amy Butler swing bag pattern. I basically used the pattern to cut pieces, and then tossed the directions aside and followed how I wanted things to go (straps aren’t twisted, I made an inner pocket, the bag doesn’t flare quite as much, I wanted stitching down the outside of the straps for a folksie look, etc).
The Photo
Before sewing the canvas lining to the gray front exterior piece, I made the photo part of the bag. I printed a 4×6 photo of Will onto inkjet canvas fabric (can’t find the link right now, but it was $12 for 6 8.5×11 sheets at Joann’s). I originally tried to make my own “inkjet” fabric (which is basically just fabric stabilized onto paper) by ironing freezer paper onto a piece of canvas (left over from making the bag lining), but every time I ran that canvas through my printer, the ink smudged around. Forking over the $12 for the already made and tested version went much better.
I cut out the photo with a 1/4″ border (I used 1/4″ seam allowances) and then grabbed some fabric to make the photo collage. I didn’t measure anything, just eyeballed it. After sewing the photo/fabric collage together, I pressed under all of the edges except the one that was going to butt up against the edge of the purse.
Then I sewed it onto the grey front exterior piece. If you wanted a cleaner look, you could hand appliqué it to hide the stitches, but I wanted the white stitches along the border.
Then I went back to constructing the bag!
Thoughts on the pattern
I like the idea of it, but in practice I think having the bag open the way it does (the sloping sides are open for several inches after the straps end) makes it feel a bit hazardous. I tend to throw my bag into the car, into shopping carts, etc, and I have some concerns that a cell phone or anything light and small (like precious chapstick) could easily slip out without my realizing it. For that reason, it is also smaller than it looks. If it was closed up to the straps, it would hold much more, but since it’s open until 1/2 an inch before the photo collage starts, it has much less usable space. I think I will tweak the shape more before purse #2. :)